Can Cooler
QUICK READAlso: koozie, can sleeve, drink sleeve
A double-wall sleeve a 12oz can or bottle drops into, keeping hands dry and the drink cold.
Full entry →
Glossary
The vocabulary of custom drinkware manufacturing - products, materials, processes, printing, compliance and trade - written for buyers, not engineers.
What each product is called and how buyers use the names.
Also: koozie, can sleeve, drink sleeve
A double-wall sleeve a 12oz can or bottle drops into, keeping hands dry and the drink cold.
Full entry →Also: volume sizing, oz and ml, capacity guide
How drinkware volume is stated in fluid ounces and milliliters, on a 12–64oz production ladder.
Capacity in drinkware is stated in fluid ounces for the US market and milliliters for most others, with 1 fl oz equal to about 29.6ml. Buyers who think in ounces still need the ml figure on EU packaging, so list both.
The common production ladder runs 12 / 17 / 20 / 32 / 40 / 64oz, though brands frequently adjust by a few milliliters for a specific look. These are nominal sizes, and actual filled volume can vary slightly with the lid and neck design.
| oz | approx ml | Typical format |
|---|---|---|
| 12 | 355 | Travel mug, kids bottle |
| 17 | 500 | Travel mug |
| 20 | 590 | Tumbler |
| 32 | 950 | Large tumbler, sports bottle |
| 40 | 1180 | Large tumbler |
| 64 | 1890 | Growler |
Sizing also shapes shipping economics, since a larger empty vessel takes more carton space and weight. A 12oz and 20oz SKU often sell together, so plan the ladder around what the buyer’s customers actually carry.
Practical takeaway: Standardize on a few sizes from the common ladder and print both oz and ml to serve both markets.
Also: car-cup size, cup-holder fit, vehicle friendly
A base diameter, typically ≤7.4cm (2.9in), sized to fit a standard car cup holder.
Cup-holder friendly describes a product whose base diameter fits a standard car cup holder, typically ≤7.4cm (2.9in). It is a dimension check, not a marketing label, and it is easy to verify with a caliper.
For travel mugs and larger tumblers, this drives the design. A straight-sided 30oz or 40oz tumbler is often too wide at the base, so manufacturers add a tapered or stepped base that narrows to fit the holder while keeping volume up top.
When ordering, treat the base diameter as a hard spec. The maximum width at the top may look impressive, but it is the bottom dimension that decides whether the cup rides safely in a car.
Practical takeaway: Confirm the actual base diameter, not the top width, against a ≤7.4cm target before selling a mug as cup-holder friendly.
Also: vacuum insulation, double-wall construction
Two steel walls with the air between them evacuated, stopping heat loss by conduction and convection.
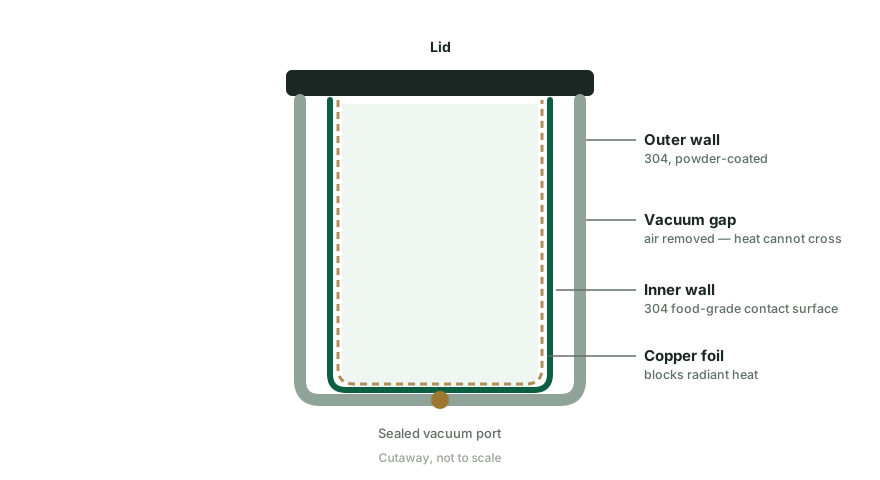
Double-wall vacuum insulation is a construction method, not a material. A bottle is formed from two stainless steel layers — an inner wall that holds the drink and an outer wall you touch — with the air between them pumped out at the sealing stage. With no air to carry heat, conduction and convection are largely removed, and the drink holds its starting temperature far longer than a single-wall vessel.
The two steel walls block conduction and convection. A thin copper foil placed between the walls, without touching both at once, reflects radiant heat that would otherwise cross the vacuum gap. That three-part structure is what produces 6-hour and 12-hour temperature ratings, and the diagram above shows how the layers sit.
| Construction element | What it blocks | Practical effect |
|---|---|---|
| Two steel walls | Conduction through metal | Outer wall stays near room temperature |
| Evacuated gap | Convection (moving air) | No air to transfer heat across the gap |
| Copper foil layer | Radiant heat | Slows the last remaining heat path |
The most useful field test for a failed vacuum is condensation. If a cold drink makes moisture appear on the outer wall, heat is crossing the wall, meaning the vacuum has been lost and the vessel will not reach its rated times.
When comparing quotes, ask where the copper foil sits and how the sealed units are tested. A well-made vessel should show no outer-wall condensation in normal use, and a spec-sheet rating should be backed by a documented insulation test on finished units rather than an estimate from material thickness.
Practical takeaway: Specify your required 6-hour or 12-hour rating and confirm the factory tests sealed finished units, not just components.
Also: insulated food container, soup jar, thermos jar
A wide-mouth insulated container, roughly 300–1000ml, for soup, oatmeal, and packed lunches.
A food jar is a wide-mouth insulated container, typically ~300–1000ml, sized so a spoon fits comfortably through the opening. It carries soup, oatmeal, or a packed lunch and keeps the contents hot or cold until mealtime.
The wide mouth is the defining feature. It allows easy filling, eating directly from the jar, and thorough cleaning — the same reason this format differs from a bottle, whose narrow neck exists for drinking.
Construction follows the same double-wall vacuum principle as insulated bottles, so hot food stays hot for a work shift or school day. Lid choice matters most here: a screw lid with a solid seal protects a bag better than a flip lid.
Practical takeaway: Check the mouth diameter against the buyer’s spoon and confirm the lid seal before listing it as lunch-bag safe.
Also: beer growler, half-gallon jug, beer bottle
A large ~64oz vessel for transporting craft beer, sealed with a screw or swing-top cap.
Full entry →Also: children's bottle, sippy cup, kids water bottle
Smaller, lighter bottles with spout or straw lids and child-safety compliance, built for school bags.
Kids bottles are smaller-capacity, lighter versions of adult drinkware, built for small hands and school bags. Spout and straw lids dominate because young children sip rather than tip and drink.
Leak resistance matters more here than almost anywhere else, since a leaking bottle ruins a backpack full of books. The slide and straw lid designs covered under lid types carry most of this job.
Child-safety requirements also apply. In the US these products fall under CPSIA rules for children’s products, which govern things like lead limits and third-party testing, so the compliance paperwork is part of the order, not an afterthought.
Practical takeaway: Treat kids bottles as a separate SKU line with its own safety testing and leak-proof lid spec, not a scaled-down adult product.
Also: drinkware lids, closure types, bottle caps
The four main drinkware lids — flip, slide, spout, and straw — trade leak resistance against flow speed.
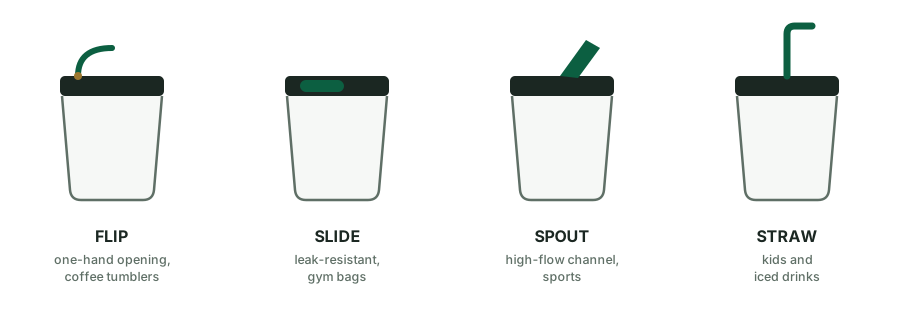
Lids are where most drinkware performance is won or lost. Four main types cover the common formats — flip, slide, spout, and straw — and each balances two competing needs: leak resistance and flow speed. No single design wins both.
A flip lid gives one-hand opening and fast drinking, which is why it is standard on coffee tumblers and travel mugs. A slide lid covers a smaller opening and resists leaks better, making it a common choice for gym bags. A spout lid channels a high-flow stream for sports bottles, while a straw lid suits kids and iced drinks where sipping beats tilting.
| Lid type | Flow speed | Leak resistance | Typical use |
|---|---|---|---|
| Flip | High | Moderate | Coffee tumblers, travel mugs |
| Slide | Moderate | High | Gym, commuting bags |
| Spout | High | Moderate | Sports bottles |
| Straw | Moderate | Moderate–high | Kids, iced drinks |
The seal count is the practical number behind leak claims. A lid with a single gasket has fewer failure points than one with several, and the number of silicone seals usually appears in the bill of materials. More seals can add redundancy, but each additional seal is another part that can be assembled wrong.
Temperature also steers the choice. Hot coffee calls for a flip or slide lid that opens cleanly without splash, while iced drinks and kids cups lean toward straw lids that slow the drinker down and reduce spills.
Lids are also the first part to fail in a dishwasher or a dropped bag. Threaded and slide designs with fewer moving parts tend to survive rough handling better than flip lids with springs, and a removable gasket is easier to clean than one molded in place. These durability details affect return rates in retail.
Practical takeaway: Match the lid type to the buyer’s end use and ask for the silicone seal count before accepting a leak-proof claim.
Also: single-layer bottle, non-insulated bottle
A single layer of steel with no insulation; the lightest, lowest-cost bottle format.
Full entry →Also: gym bottle, sports bottle, bike bottle
A taller, grip-friendly bottle with a high-flow spout or straw lid, in single-wall or vacuum form.
A sports water bottle is a taller, narrower format built for drinking on the move. Its diameter is chosen for an easy grip, and it is paired with a high-flow spout or straw lid rather than an open mouth.
The format splits into two constructions. A single-wall version keeps weight down for the gym, while a vacuum version suits outdoor use where water should stay cold for hours. The choice is a weight-versus-temperature trade-off.
| Use case | Construction | Typical lid |
|---|---|---|
| Gym, short session | Single wall | Spout or flip |
| Outdoor, all day | Double-wall vacuum | High-flow spout or straw |
Grip is part of the spec. A diameter that is comfortable for most adult hands, often with a slight texture or powder coat, matters as much as capacity when the bottle is held while running or hiking.
Practical takeaway: Decide between single-wall and vacuum first, since that single choice drives weight, price, and holding time.
Also: coffee mug, commuter mug, car mug
A lid-centric mug with a handle or tapered base sized for car cup holders, typically ~12–17oz.
A travel mug is a lid-centric cup built to go in a car. Its defining features are a drinking lid and either a handle or a tapered base sized to fit a cup holder, usually at a capacity of ~12–17oz.
The difference from a tumbler comes down to form and focus. A tumbler is open and decorative; a travel mug prioritizes one-hand drinking and spill control, with the lid carrying most of the sealing and opening mechanism.
The lid is where travel mugs succeed or fail. Flip lids give one-hand opening for coffee, while slide and threaded lids trade some flow for better leak resistance; the same lid options covered under lid types apply here.
Most travel mugs use double-wall vacuum insulation to keep coffee hot for a commute, and the handle or taper also keeps the drinker’s hand away from a hot outer surface.
Practical takeaway: Confirm the base diameter against standard cup holders before ordering a handle-less travel mug.
Also: insulated cup, stemless cup, 20oz tumbler
A stemless, flat-bottomed cup, typically ~20oz, and the default format for custom branding.
Full entry →Also: stemless wine cup, insulated wine glass, pool wine glass
A ~10–12oz stemless cup with a curved lip, made for wine outdoors or by the pool.
Full entry →The metals, plastics and liners inside your cup - and what the labels actually mean.
Also: 18/8 stainless steel, SUS304, 304 SS
The workhorse food-grade steel (18% chromium / 8% nickel) behind most everyday drinkware - and what "food-grade" actually guarantees.
304 stainless steel – often written 18/8 – is the workhorse metal of the drinkware industry: roughly 18% chromium for corrosion resistance and 8% nickel for stability and shine. If a product page says "food-grade stainless steel" without a number, 304 is almost always what is inside.
| 304 / 18-8 | 316 / 18-10 | |
|---|---|---|
| Corrosion resistance | Excellent for daily use | Superior (added molybdenum) |
| Best for | Everyday bottles & cups | Coastal markets, marine use |
| Relative cost | Baseline | ~15-25% higher material cost |
Practical takeaway: for most retail programs 304 is the right call; specify 316 when your market sells into humid coastal climates.
Also: ABS, AS, polycarbonate
ABS is a rigid shell and handle plastic; AS and PC are clear plastics, with PC containing BPA.
Full entry →Also: boro glass, thermal-shock-resistant glass
Thermal-shock-resistant glass for glass drinkware that survives boiling water and freezer transitions better than soda-lime.
Borosilicate glass is the thermal-shock-resistant glass used on glass drinkware lines. It survives sudden temperature changes, such as boiling water into a cold vessel, far better than ordinary soda-lime glass.
That resistance comes from its composition, which expands less with temperature change than soda-lime glass. It also handles freezer-to-hot transitions with far fewer cracks.
Many glass bottles marketed as thermal-shock resistant are borosilicate; ask for the glass type if the product will be sold for boiling water.
Unlike steel, glass shows its contents, which some buyers value for fruit-infused water and tea. That transparency also makes any scratches or mineral film visible, so cleaning matters. Soda-lime glass is cheaper but cracks more readily under thermal shock, so it suits cold drinks rather than boiling-water use.
The trade-off is weight and cost. Borosilicate is heavier than steel for a given part, and it can still break on hard impact.
Practical takeaway: Choose borosilicate for glass bottles and mugs intended for hot liquids and temperature swings, and plan for heavier shipping weight.
Also: BPA free, bisphenol-A free
BPA is bisphenol A, found in polycarbonate; on steel drinkware it only concerns plastic parts like lids and gaskets.
BPA, or bisphenol A, is a chemical building block used in some plastics, most notably polycarbonate. It has drawn attention because it can migrate from plastic into food and drink, especially when the plastic is heated. That migration risk is why BPA has been restricted or phased out for many food-contact applications.
On a stainless-steel bottle, the food-contact surface is steel, and steel contains no BPA. BPA only concerns the plastic parts: lids, gaskets, straws, and spouts. A “BPA-free bottle” claim therefore refers to the plastic components, not the steel body.
The buyer’s real question is not whether the bottle is BPA-free, but whether each plastic part that touches liquid or the mouth is made from an appropriate, tested material.
| Claim on the box | What it actually tells you |
|---|---|
| BPA-free | No BPA in the named plastic, with no detail on substitutes |
| Food-grade | Safe for food contact, but not a specific test result |
| LFGB / FDA report | Documented migration or safety testing on file |
The strongest evidence is a per-part material declaration plus LFGB or FDA test reports. That tells you which plastic is used in each component and that it has been tested, rather than asking you to trust a two-word label.
Markets differ in how they enforce this. LFGB is generally stricter than FDA on migration, and California’s Prop 65 adds labeling requirements. Knowing your destination market tells you which reports to collect.
Practical takeaway: Ask for a per-part material declaration plus matching LFGB or FDA reports instead of accepting “BPA-free” as a complete safety claim.
Also: ceramic coating, ceramic lined
A ceramic coating over the steel interior that improves taste purity, not insulation.
A ceramic inner liner is a thin ceramic coating applied over the steel interior of a drinkware vessel. Its job is about taste purity and a smooth, non-metallic feel, not insulation.
The coating resists staining and reduces the metallic taste some users notice in plain steel. It also gives a premium, coffee-friendly interior finish.
The liner is usually applied to the inner wall before the body is assembled, so the steel structure protects it from scratches. Coatings come in matte and gloss finishes.
Durability varies with coating quality. Ask about adhesion testing and dishwasher performance before committing to large runs, because a peeling liner becomes a warranty problem.
Practical takeaway: Use a ceramic liner to sell taste purity and a premium interior, not to claim better insulation.
Also: copper vacuum, copper plated, copper layer
A thin copper foil between the inner and outer walls that improves heat retention and never touches the drink.
A copper lining is a thin copper foil applied to the outer face of the inner wall, sitting inside the vacuum gap between the two steel walls. It works as a radiant barrier that reflects heat back, improving heat retention by a small but measurable margin.
“Copper vacuum” and “copper plated” are common marketing terms for this construction. The copper never touches the drink, and it is not a structural layer.
The copper is also a visual selling point, since it can be seen through clear outer shells on some designs. The foil is thin enough that it adds little weight to the bottle.
Practical takeaway: Treat copper lining as a modest heat-retention and visual upgrade, not a substitute for a proper vacuum.
Also: silicone, platinum-cured silicone
Heat-tolerant elastomer for seals and straws; platinum-cured is the premium grade and LFGB tests it most strictly.
Food-grade silicone is the standard material for seals, straws, spouts, and grips. It is soft, heat-tolerant, and does not leach the way some plastics can.
Within food-grade silicone, platinum-cured is the premium choice. It has fewer extractables and less odor than peroxide-cured silicone, which is the cheaper alternative.
LFGB tests silicone more strictly than FDA, especially for odor and taste. For European markets, expect to meet LFGB rather than FDA alone.
Silicone hardness is measured in durometer; softer seals compress more easily to close a lid, while firmer grades resist wear longer. Suppliers should quote the cure type and, where relevant, the durometer.
Practical takeaway: Ask whether seals and straws are platinum-cured, and request LFGB or FDA test reports for the silicone parts.
Also: food-safe stainless, food-contact stainless
A marketing phrase meaning the steel is safe for food contact; ask for the actual grade number and a test report.
Full entry →Also: o-rings, seals, gaskets, silicone rings
Silicone or TPE o-rings that make lids leak-resistant; wear parts, and most leaks trace to a seal, not the welds.
Also: PP, polypropylene, plastic #5
Recycling code 5 plastic, heat tolerant to roughly 100–120°C, the standard choice for lid bodies and inner parts.
Full entry →Also: 316 stainless, 18/10 stainless, 316L stainless, marine-grade stainless
Austenitic stainless with ~2% molybdenum that resists chlorides better than 304, suited to coastal, marine, and premium programs.
Stainless steel 316 is an austenitic stainless with a typical composition of roughly 16% chromium, 10% nickel, and 2% molybdenum. Chromium forms the passive oxide layer that resists corrosion, nickel adds toughness and formability, and molybdenum is the element that separates 316 from ordinary 304. Some suppliers label 316 as 18/10, echoing the chromium and nickel figures, but the molybdenum is what actually identifies the alloy.
Molybdenum is what gives 316 its resistance to chlorides. Salt spray, coastal air, and sweat all carry chlorides that can pit 304 stainless over years of use. A drinkware product that cycles between hot and cold, or that lives near salt water, is exactly the kind of product where that extra resistance pays off.
| Property | 304 | 316 |
|---|---|---|
| Molybdenum | None | ~2% |
| Chloride resistance | Good | Better |
| Relative material cost | Baseline | Typically ~15–25% higher |
| Typical use | General drinkware | Coastal, marine, premium |
316L is the low-carbon variant of 316. Lower carbon reduces carbide precipitation during welding, so 316L welds cleaner and is the usual choice where a component needs a welded seam. For most one-piece drinkware bodies the difference is minor, but it matters on parts with visible or structural welds.
Specifying 316 raises cost and can lengthen lead time, because 316 coil is more expensive and less readily stocked than 304 in some thicknesses. If the target market does not involve chlorides, 304 usually delivers the same day-to-day performance at a lower price.
Practical takeaway: Specify 316 when your market is coastal or marine, or when a premium program justifies a documented corrosion upgrade over standard 304.
Also: Tritan, Eastman Tritan
Eastman's BPA-free copolyester, a clear, impact-resistant plastic for bottles and lid windows.
Tritan is Eastman’s brand name for a BPA-free copolyester. It is a clear, impact-resistant plastic used for bottle bodies, lid windows, and other parts where a glass-like look is wanted without the weight or breakage risk of glass.
Tritan handles impacts well and tolerates dishwasher cycles. Unlike polycarbonate, it does not gradually cloud after repeated hot washing.
It costs more than polypropylene or polycarbonate, so it usually appears on mid- to premium products. Verify the resin name with your supplier, because “Tritan” is a specific material, not a generic term for clear plastic.
Specifying Tritan is common on kids’ bottles and premium sports bottles, where clarity and impact resistance matter. It also holds its shape in lid windows that sit over hot liquids. Cheaper lookalike clear plastics can cloud or crack under repeated hot washing, so confirm the resin name before approving samples.
Practical takeaway: Specify Tritan when you need a clear, dishwasher-tolerant plastic part and can absorb the higher part cost.
How a flat steel disc becomes a finished, insulated vessel.
Also: Bead blasting, buffing, satin finishing, surface finishing
Surface finishing from a uniform matte bead-blast to a mirror polish.
Surface finishing sets both the look and the feel of a steel vessel. Bead-blasting fires fine glass or ceramic beads at the surface, creating a uniform matte texture. Buffing polishes the surface to a mirror shine. Satin sits in between, giving a brushed look with fine directional lines.
The choice affects fingerprints. A matte, blasted surface hides fingerprints and small scratches well, while a mirror finish shows them clearly. That is a practical point for buyers who want bottles to look clean in retail photos and on shelves.
Finishing also feeds into the next steps. A blasted or brushed surface gives coatings something to grip, improving adhesion of paint or powder. The surface condition before coating matters as much as the coating itself.
Practical takeaway: Choose the finish for its handling and coating-adhesion behavior, not just its appearance, and confirm it on a production sample before bulk order.
Also: Deep draw stamping, deep-draw forming, metal deep drawing
A process that presses flat steel discs through progressive dies into cup-shaped vessel bodies.
Every steel drinkware vessel starts as a flat disc. Deep drawing presses that disc through a series of progressive dies, each pass pulling the metal deeper until it becomes a cup. Stamping is the broader family of operations; deep drawing is the specific one that forms a hollow body rather than simply cutting a flat shape.
Wall thinning is the key quality concern. As metal is drawn it stretches and gets thinner, especially near the sidewall and base corners. If thinning is uneven, the wall will not insulate uniformly and the vessel may dent more easily in one spot. A well-run line controls draw ratio, blank thickness, and die clearance so thickness stays within an acceptable band.
For double-wall bottles the process is run twice, or a separate inner wall is drawn and later joined to the outer. Buyers usually care about consistent weight, even wall thickness, and smooth internal surfaces, all of which trace back to this step.
Practical takeaway: Ask your factory how it controls wall thickness during drawing, since that single variable drives insulation, weight, and dent resistance.
Also: Plating, PVD coating, physical vapor deposition, electroplating
Wet electroplating versus vacuum-chamber PVD for metallic and gradient finishes.
Electroplating is a wet chemical process. The part is immersed in a solution containing metal ions, and an electric current deposits a metal layer onto the surface. It builds a thicker layer than PVD, which can fill small surface irregularities, but that thicker plated layer can also chip or peel if it takes a sharp impact.
PVD is a vacuum-chamber process. The coating material is vaporized and condenses onto the part, bonding at the molecular level. The result is an extremely wear-resistant metallic finish, and PVD is the go-to method for metallic and gradient effects that must survive heavy use. The main downside is cost — PVD equipment and cycle time are more expensive, so it raises unit price.
| Attribute | Electroplating | PVD |
|---|---|---|
| Process | Wet chemical, electric current | Vacuum chamber, vaporized coating |
| Layer | Thicker, can chip | Thin, molecular bond |
| Wear resistance | Moderate | Very high |
| Cost | Lower | Higher |
From a sourcing standpoint, the decision is usually driven by the product tier and the expected use. A budget bottle can wear a plated finish acceptably if it is handled gently, while a premium bottle that buyers expect to survive years of daily use generally justifies PVD.
Surface preparation matters for both methods. Plating and PVD reveal every defect in the metal underneath, so the steel is normally polished or blasted first. A rough base means an uneven metallic finish, so a supplier that skips prep will show it in the final sample. The underlying metal is typically ~304 or ~316 stainless, and either finish should be checked against your own wear and salt-spray testing before approval.
Practical takeaway: Budget PVD for high-end metallic finishes that must resist wear, and use electroplating only where a lower-cost metallic look is acceptable and chipping risk is low.
Also: Electrochemical polishing, electro-polish
Electrochemical smoothing that improves steel cleanliness and corrosion resistance.
Electropolishing smooths a metal surface electrochemically. The part is made the anode in a bath, and controlled current dissolves a very thin layer of metal from the peaks of the surface. The result is smoother than mechanical polishing can typically achieve at a microscopic level.
In drinkware it is usually applied to the inner steel surface. The smoother, more level surface is easier to clean and offers fewer microscopic crevices where residue or bacteria could cling. This is a meaningful step for the drink-contact side.
Electropolishing also improves corrosion resistance beyond mechanical polishing, because it removes stressed surface metal and leaves a more uniform, passive-friendly surface. It is often paired with passivation for the best result.
Practical takeaway: For food-contact interiors, ask whether the inner wall is electropolished and passivated, since the two steps together drive cleanliness and corrosion resistance.
Also: Laser beam welding, LBW
A focused laser beam that welds thin steel with a minimal heat-affected zone.
Laser welding focuses a concentrated beam of light onto a seam, melting the metal in a very small spot to fuse two parts. Because the energy is so concentrated, the surrounding area heats up far less than with other methods — this is called a small heat-affected zone.
For thin steel, that control matters. Thin stainless deforms and oxidizes easily when overheated, and a wide heat-affected zone can weaken the material right where the weld should be strongest. Laser welding is cleaner and more precise than TIG for these parts.
In drinkware, laser welding is used on vacuum-critical seams — the joins around the inner and outer walls, and often the tail-plug closure after evacuation. A clean, narrow weld here means less discoloration and a better-looking, stronger seam.
Practical takeaway: When comparing suppliers, look at the weld seams on production samples for width and discoloration, which reflect the control of the laser welding process.
Also: Neck finish, thread finish, bottle thread, thread rolling
The threads rolled or machined at a bottle mouth that define how the lid seats and seals.
The neck finish is the shaped opening at the top of the bottle — the diameter, thread form, and shoulder geometry that the lid mates with. Threads here are typically rolled or machined into the steel rather than cut separately.
The thread profile does the sealing work. A clean, consistent thread lets the gasket compress evenly all the way around the rim. If the thread is rough, too shallow, or misaligned, the lid can bottom out before the seal is fully compressed, and the bottle leaks slowly.
A poor thread finish is one of the most common causes of the slow-leak complaints buyers report after months in the field. The bottle may pass an initial pressure test but seep liquid once the gasket takes a set or the user cross-threads the lid.
Practical takeaway: Request sample lids from the same tooling as production and inspect thread engagement and gasket seating, not just the printed thread specification.
Also: Passivation, inner-wall passivation, acid passivation
Acid treatment that restores stainless steel's protective chromium-oxide layer.
Stainless steel resists corrosion because of a thin, self-healing chromium-oxide layer on its surface. Machining and welding can disturb that layer and leave free iron behind, which is where rust can start. Passivation fixes this.
Passivation treats the surface with an acid — nitric or citric — that removes free iron from the surface and helps restore a clean, protective chromium-oxide layer. It does not add a coating; it returns the steel to its natural passive state.
On drinkware, passivation is a food-safety and corrosion-resistance step applied to the drink-contact surface. It helps ensure the inner wall stays clean and resists pitting over years of contact with water, coffee, tea, and acidic beverages.
Practical takeaway: Confirm the inner wall is passivated, and ideally electropolished, as part of your food-contact quality plan rather than treating it as an optional cosmetic step.
Also: Powder coat, electrostatic powder coating
A dry powder sprayed electrostatically and oven-cured into a tough, solvent-free finish.
Powder coating applies a dry powder made of resin and pigment. The powder is given an electrostatic charge and sprayed onto the grounded metal part, where it clings. The part then goes through an oven where the powder melts and cures into a continuous solid film. There are no liquid solvents, which makes the process cleaner than liquid painting.
The cured film is thicker and more durable than a typical liquid paint layer, so it resists chips, scratches, and daily handling better. It is the finish responsible for the soft, slightly textured grip feel on most modern bottles. Buyers often specify it because it survives shipping and rough use well.
| Finish | Thickness | Durability | Typical use |
|---|---|---|---|
| Powder coating | Thicker film | High, chip-resistant | Colored bottle bodies, grip feel |
| Liquid spray paint | Thinner film | Moderate, can chip sooner | Gradients and fine detail |
| PVD | Very thin, metallic | Highest, hardest | Metallic and gradient effects |
Color and texture also matter. Powder coating can be formulated in a wide range of solid colors and surface textures, from smooth to a fine grain. It holds color well, though very dark or very bright shades should still be checked for dishwasher and UV fading as part of your own testing.
The tradeoff is mostly about flexibility and color range. Powder coating excels at solid, durable colors, but liquid paint and PVD are better when the design needs fine gradients or a true metallic look. Choose the finish against how the bottle will actually be used and shipped.
Practical takeaway: Specify powder coating for solid-color, high-wear bottles and reserve liquid paint or PVD for designs that genuinely need gradients or metallic effects.
Also: UV painting, UV-cured paint, UV coating
Liquid paint cured with UV light, used for gradients and visual effects.
Full entry →Also: Vacuum sealing, tail-plug sealing, getter sealing, vacuum brazing
How the gap between a bottle's inner and outer walls is evacuated and permanently sealed.
A double-wall vessel is not born with a vacuum inside. After the inner and outer walls are joined, a small hole is left in the base. The bottle is placed in a vacuum chamber, air is pulled out through that hole, and the opening is then closed. In most designs a small steel plug — the tail plug — is welded into the hole to seal the evacuated space. If this weld fails or the plug leaks, outside air slowly enters and the insulation fades.
Some designs use brazing instead of, or in addition to, a welded plug. Brazing joins metal parts with a filler that melts at a lower temperature than the base metal, which can be gentler on thin steel and reduce distortion. Getter materials add another layer of protection: a getter absorbs residual gas molecules left behind after evacuation, helping the bottle hold its vacuum for years rather than months.
Vacuum is the mechanism behind every insulated bottle, so slow vacuum loss is the failure mode a buyer eventually sees as declining insulation. A bottle that held drinks hot for twelve hours when new might manage only six after a year of use if the seal is slowly letting air in. The defect is usually invisible from the outside, which is why it can go unnoticed until customers complain.
During production, the quality focus is on the completeness of the seal and the residual gas level after sealing. A good supplier measures these directly rather than relying only on a final hot-cold test, because a small leak can pass a quick check and still degrade over time.
| Stage | What happens |
|---|---|
| Evacuation | Air is drawn from the gap through a base hole under vacuum |
| Plug welding | A tail plug is welded to close the hole and hold the vacuum |
| Brazing (optional) | Lower-temperature filler joins parts, gentler on thin steel |
| Getter activation | Getter absorbs residual gas to slow vacuum loss |
Practical takeaway: In quality discussions, ask about vacuum-retention testing over time and getter use, since these predict insulation longevity better than the new-bottle test result alone.
Every way we put your brand on a product, and what each method is good at.
Also: artwork specs, print file requirements, decoration artwork
The file and technical rules artwork must meet, such as vector files with outlined text and minimum line widths.
Supply vector files such as AI, PDF, or EPS with all text converted to outlines. Converting text to outlines means the factory does not need the original fonts to reproduce your logo, which prevents substitution errors and layout shifts.
Minimum line widths apply to printing. Very thin lines, typically around 0.3 mm or more for print, reproduce cleanly, while finer strokes may drop out or break up on the bottle surface. Check this before approving artwork with small legal text or delicate details.
The number of solid colors drives setup cost, since each color adds a screen or a plate. Simplify the palette to reduce cost without changing the design’s intent. Raster images, when used, need higher resolution for heat transfer than for simple screen print, because they are enlarged across a full wrap.
Practical takeaway: Deliver outlined vector artwork with line widths of typically 0.3 mm or more and confirm the color count, since it directly sets your setup cost.
Also: colorfastness, dishwasher-safe printing, wash durability
How well print survives washing and handling, which depends on method, coating, and cure quality rather than a dishwasher-safe label.
Colorfastness describes how well the printed design keeps its color through washing, handling, and daily use. On drinkware, the question buyers ask most often is whether the print survives the dishwasher, and the honest answer is that no single phrase settles it.
Silk-screen prints cured onto powder coat tend to be very durable, while heat-transfer wraps can be slightly more wear-prone on some coatings. The coating and cure quality matter as much as the method: a poorly cured screen print can fail sooner than a well-applied transfer.
Because no decoration lasts forever, many premium coated bottles recommend hand-washing to maximize print life. If your customer expects dishwasher use, state it early so the factory can choose a method and cure process suited to that condition and validate it with a sample.
Practical takeaway: Treat “dishwasher-safe printing” as a claim to verify on your exact method and coating with a tested sample, not as an automatic guarantee.
Also: embossing, debossing, 3D embossing
A decoration method that forms a raised or recessed logo directly in the metal itself, requiring a custom tooling die.
Embossing raises a logo above the surrounding surface, while debossing presses it in below. Both are formed in the metal itself rather than printed on top, which gives the mark a premium tactile quality that flat printing cannot match.
The process requires custom tooling dies shaped to your logo, so there is an upfront tooling cost and a lead time before the first production run. Once the dies exist, the mark is permanent, since there is nothing applied to the surface that could rub off.
This method works best on stainless drinkware where the metal wall is thick enough to hold a clean raised or recessed impression. It suits brand names, monograms, and simple geometric marks, while very fine detail can be lost in the forming step.
Practical takeaway: Use embossing or debossing when you want a permanent, tactile metal logo and are prepared for the tooling die cost and lead time.
Also: heat transfer, heat-transfer film, wrap printing
A decoration method that prints artwork onto a carrier film, then applies it to the bottle with a heat press for full-wrap, photo-real coverage.
Heat-transfer printing first prints the artwork onto a carrier film, then applies that film to the bottle under a heat press. Heat and pressure bond the printed layer to the surface. Because the artwork is prepared flat, the method handles full-wrap coverage, gradients, and photographic detail that screen printing cannot reproduce.
This is the standard method for photo-real or multi-color wraps, such as a full-circumference scene, a gradient background, or detailed photography on the bottle body. It is also efficient when a single design spans most of the surface, since the wrap can carry the entire image in one pass rather than registering many colors separately.
The main trade-off worth stating plainly: on certain powder coatings, a heat-transferred wrap can be slightly more wear-prone than a direct screen print. For a small solid logo on a coated bottle, screen printing is often the more durable and cheaper option. For photo-real or all-over artwork, heat transfer is the practical choice despite that small durability gap.
A practical detail for full wraps is the back seam, where the two ends of the artwork meet. Suppliers usually plan a small overlap or a discreet join, so if your design has a continuous pattern, agree in advance on where that seam will fall so it does not cut through the focal artwork.
| Factor | Heat-transfer printing |
|---|---|
| Coverage | Full wrap around the circumference |
| Gradients and photos | Supported |
| Durability vs screen print | Slightly lower on some coatings |
| Best for | Photo-real, multi-color, all-over designs |
Practical takeaway: Use heat-transfer printing for full-wrap, gradient, or photographic artwork, and weigh its slightly lower wear resistance against screen printing when the surface is a powder coating.
Also: laser etching, laser marking
A permanent, ink-free decoration method where a laser removes coating or marks bare steel so the metal beneath shows through.
Laser engraving uses a focused laser to remove the surface coating or mark bare steel, so the layer beneath shows through as the design. There is no ink involved, which means nothing to wear off, peel, or fade over time.
The result is permanent and single-color: whatever the laser reveals, such as bare steel on a powder-coated bottle or the metal itself on uncoated steel, becomes the mark. This limitation is also the appeal, since the finish has a clean, premium feel that suits minimalist brand marks and text.
It works on both powder-coated and bare stainless surfaces. Because it is a subtractive process, it is best for crisp line art and logos rather than filled photographic areas, and the contrast depends on the color and thickness of the coating beneath the laser.
Practical takeaway: Choose laser engraving when you want a permanent, premium single-color mark with no ink to wear off.
Also: tampo printing, tampography
A decoration method that uses a silicone pad to transfer ink from an etched plate onto small or curved spots, such as near a handle.
Pad printing uses a soft silicone pad to pick ink off an etched plate, called a cliché, and press it onto the product. The pad is flexible enough to wrap around small curves and reach into narrow spots that a flat screen cannot touch.
This makes it the right tool for small logos placed on curved or tight areas, such as on the neck, near a handle, or on the bottom of a tumbler. It prints fine detail well at small sizes, though it is not designed for large solid areas or full wraps.
Setup is modest, and the method handles a single color cleanly. Multi-color pad printing is possible but adds registration steps, so most buyers use it for a compact one-color mark in a location other methods cannot reach.
Practical takeaway: Pick pad printing for small, single-color logos on curved or narrow areas where a screen cannot make contact.
Also: PMS matching, color matching, Pantone color
The practice of specifying brand colors by Pantone (PMS) number and matching the print to a physical swatch within a small color difference.
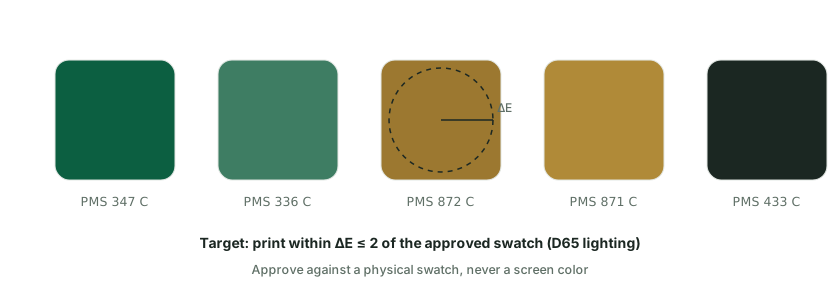
Brand colors are specified as Pantone Matching System (PMS) numbers so everyone is aiming at the same reference. Labs and factories target a small color difference between the approved swatch and the finished print, commonly around ΔE ≤ 2 when measured under D65 lighting. This gives both sides an objective pass-or-fail yardstick instead of arguing over a screen.
An approved physical swatch always beats a screen color. Monitors vary, and a color that looks right on a laptop may print differently on a coated bottle. Sending a physical Pantone chip or a pre-approved production sample removes that ambiguity before the run begins. Even two screens showing the same file can render slightly different tones, which is why the physical reference is non-negotiable for brand work.
For powder-coat colors, the finish is custom-matched in batches, which can carry a minimum order because the coating is blended specifically for your brand. The same logic applies to print inks: closer matching tolerances mean more careful setup and, sometimes, a higher unit cost. Confirm with the factory which tolerance they can realistically hold on your specific coating before you lock a brand standard, because tighter tolerances can affect both cost and the minimum order.
| Step | What to provide |
|---|---|
| Specify the color | Pantone (PMS) number |
| Define the standard | Approved physical swatch or sample |
| Set the tolerance | Typically ΔE ≤ 2 under D65 lighting |
| Confirm the finish | Matched on the actual coating or ink system |
Practical takeaway: Always send an approved physical swatch alongside the Pantone number so the factory matches to a real standard rather than a screen.
Also: print area, wrap width, decoration area
The printable zone on a bottle, quoted as height by wrap width, where full wrap means the entire circumference is covered.
Print area is quoted as two dimensions: height and wrap width. The wrap width is how far the artwork extends around the bottle, and full wrap means it covers the entire circumference with the design meeting at the back seam.
Artwork must account for curvature near the edges. As the design approaches the sides of the print area, the curved surface compresses detail, so text and logos should sit within a safe zone that is slightly smaller than the quoted dimensions.
A larger print area generally means more setup and registration work, but it does not always mean more cost. A simple solid logo spread across a wider area may cost little more than a small one, while a complex full-wrap photographic design involves a different method entirely.
Practical takeaway: Confirm the height and wrap width with your supplier and keep key artwork inside the safe zone to avoid distortion at the curved edges.
Also: screen printing, silkscreen, screen print
A decoration method that pushes ink through a mesh screen, one screen per solid color, to print flat, durable logos on drinkware.
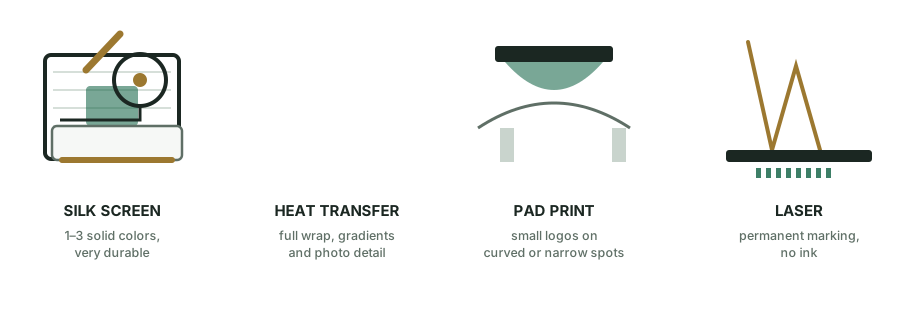
Silk-screen printing pushes ink through a fine mesh screen directly onto the bottle or tumbler. Each solid color in the design gets its own screen, and the colors are applied one after another with careful registration between passes. Because setup is per color rather than per piece, one-to-three-color logos run fast and are inexpensive in production volume.
This is the economical default for solid-color logos, word marks, and simple line art. It bonds especially well to powder-coated surfaces, where cured ink holds up through shipping, retail handling, and daily use. The method’s limit is tonal range: it prints flat, solid areas, so photographic gradients and soft blends are out of scope. For those, see heat-transfer printing.
For a single Pantone color or a simple two-color lockup, screen printing is hard to beat on cost per unit. Setup charges are modest and amortize quickly across a run, while the print stays crisp even at small logo sizes. Pushing past roughly three colors adds screens and registration steps, at which point many buyers move to heat transfer for busier artwork.
| Factor | Silk-screen printing |
|---|---|
| Best for | 1–3 solid colors, logos, text |
| Photographic gradients | Not suitable |
| Durability on powder coat | Very high |
| Setup cost | Low, charged per color |
The diagram above shows screen printing alongside the other common decoration methods, so you can compare coverage and typical use cases at a glance. Flat, solid areas are also easy to inspect, so color or coverage defects are quick to spot on the line.
Practical takeaway: Choose silk-screen printing for logos of three solid colors or fewer to keep unit cost low without sacrificing durability on coated surfaces.
Also: hydro-dipping, water transfer, hydrographic printing
A decoration method that floats a printed film on water and transfers patterns such as woodgrain or camo over complex curves.
Full entry →Tests, standards and audits - what they check and who enforces them.
Also: Acceptable Quality Limit, ANSI/ASQ Z1.4 sampling
AQL sampling is a statistical method, per ANSI/ASQ Z1.4 and ISO 2859-1, used to decide acceptance in pre-shipment inspection.
Acceptable Quality Limit (AQL) is a statistical sampling method used in pre-shipment inspection, based on standards such as ANSI/ASQ Z1.4 and ISO 2859-1. Instead of checking every unit, the inspector draws a sample and compares the defects found to an agreed limit.
AQL is expressed per defect class. A common level is AQL 2.5 major / 4.0 minor, meaning the sample may contain up to a set proportion of major and minor defects and still pass. Critical defects, such as safety hazards, are usually set to zero.
The buyer defines the AQL in the inspection brief. The level you choose balances cost and risk: a tighter AQL with lower numbers rejects more lots, while a looser level accepts more variation. A level like 2.5 major / 4.0 minor is a common starting point, but you can tighten or loosen it by product and market.
Practical takeaway: Put the AQL levels and defect classification in your inspection brief so the inspector and the factory work to the same acceptance standard.
Also: amfori BSCI, Business Social Compliance Initiative
BSCI is amfori's social-compliance audit covering labor conditions, working hours, and workplace safety, commonly required by EU retail chains.
BSCI, the Business Social Compliance Initiative run by amfori, is a social-compliance audit of a factory’s labor practices. Auditors check working hours, wages, freedom of association, workplace safety, and environmental basics against a code of conduct.
It is audit-based rather than certification-based, and the result is an audit report with a grade rather than a pass/fail certificate. Results are typically reported in a 0–2 range, and the report is shared with participating buyers on the amfori platform.
BSCI is commonly required by EU retail chains and brands before they will place an order. It is a social audit, so it complements, rather than replaces, product safety testing and quality inspections. Some buyers also ask for a corrective-action plan showing how the factory is closing any findings from the last audit.
Practical takeaway: Ask for a recent BSCI audit report and check the grade and any open findings before committing to a factory for EU retail accounts.
Also: Prop 65, California Proposition 65
Prop 65 is a California labeling law requiring warnings when listed chemicals exceed safe-harbor levels such as NSRL or MADL.
California Proposition 65 is a labeling law, not a product-safety standard in the usual sense. It requires businesses to warn California consumers when a product exposes them to a chemical on the state’s list above a defined level. For drinkware, the chemicals most often involved are lead and cadmium in coatings, decoration, or the base material.
The law sets safe-harbor thresholds: an NSRL (No Significant Risk Level) for carcinogens and a MADL (Maximum Allowable Dose Level) for reproductive toxins. A product below the threshold needs no warning; a product above it must carry one. The chemical list is maintained by California’s Office of Environmental Health Hazard Assessment, and the warning format is set by regulation. These thresholds are deliberately conservative.
A Prop 65 warning means a listed chemical is present above a very conservative threshold, not that the product is unsafe. Many everyday products carry the warning because the threshold sits far below levels most regulators consider hazardous. Even so, a warning on a child’s bottle will alarm retail buyers and end consumers. For a brand seller the decision is commercial as much as technical, because a label on a premium product can affect conversion even when the product is fully safe.
Exporters effectively choose between two approaches:
| Approach | What it involves | Trade-off |
|---|---|---|
| Test for exemption | Lab confirms levels below safe-harbor thresholds | Report cost, no label needed |
| Label the product | Affix the required warning | No test cost, but the warning may deter buyers |
| Test and label | Do both | Maximum coverage |
Practical takeaway: Decide up front whether to test for Prop 65 exemption or to label, and put that decision in your purchase agreement so the factory and lab work to the same target.
Also: Consumer Product Safety Improvement Act
CPSIA is the US Consumer Product Safety Improvement Act, setting lead and phthalate limits and testing rules for children's products.
The Consumer Product Safety Improvement Act is a US law governing the safety of consumer products, with specific lead and phthalate limits for children’s products. It applies to kids bottles, sippy cups, and any drinkware marketed to children twelve and under.
The lead limits cover the accessible substrate and surface coatings, while the phthalate limits apply to plasticized components. For children’s products, testing must be done by a CPSC-accepted third-party lab, and the manufacturer issues a Children’s Product Certificate listing the standards and tests.
The certificate is a legal document the importer relies on, and it should name the product, the standards, and the lab. If a product is sold in the US without it, the importer can face recalls or fines.
For general-use adult drinkware, CPSIA still applies to certain substance limits even when the full children’s-product certification does not. A supplier should know which category your product falls into.
Practical takeaway: If your product is a kids bottle or sippy cup, confirm the factory has CPSIA third-party test reports and can provide the Children’s Product Certificate for your SKU.
Also: FDA food-contact compliance, 21 CFR compliance
FDA compliance means a product's food-contact materials meet US FDA limits under 21 CFR 170–199, shown by a lab test report rather than a certificate.
In the United States, the FDA regulates food-contact materials under 21 CFR 170–199. These rules set out which substances may touch food and how much of a substance may migrate into it. For drinkware, FDA compliant means the materials in the bottle, lid, gasket, and any plastic liner fit within those rules. It is not a certificate a product owns, and there is no FDA approval logo a factory can legally print on packaging.
When a factory says a product is FDA compliant, it is stating that the raw materials are cleared food-contact grades used within the FDA’s limits. The typical combination in stainless drinkware is 18/8 stainless steel, polypropylene, Tritan, and food-grade silicone. Stainless drinkware reports typically reference the sections covering metals, polymers, and elastomers, and the report should reflect each component’s applicable section. The claim is only as good as the documentation behind it.
A lab tests the materials against the relevant FDA limits and issues a report that names the material, the standard or CFR section, the test conditions, and the result. Check three things: the report covers your exact SKU, it lists every food-contact component, and it is current for the production version you are ordering.
A comparison of the wording you will see:
| Wording | What it means | What to request |
|---|---|---|
| FDA compliant materials | Materials fall within FDA limits | FDA test report per material |
| FDA approved product | Misleading shorthand | The underlying lab report |
| FDA registered facility | Factory registration, not product approval | Registration number plus product report |
Practical takeaway: Ask for the lab test report covering your exact SKU and every food-contact material rather than accepting an FDA compliance claim at face value.
Also: thermal retention test, hot-cold retention test
Insulation performance tests measure heat or cold retention, and results depend on fill temperature, volume, ambient temperature, and lid position.
Insulation performance tests measure how long a bottle keeps liquid hot or cold. Typical marketing claims are holds hot 6–12 hours or keeps cold 24 hours, but those numbers mean little without the test conditions attached.
Retention depends on fill temperature (for example, 95°C versus 100°C), fill volume, ambient temperature, and whether the lid is closed or open. A bottle tested with a near-boiling fill and a closed lid in a warm room will post better numbers than one tested with cooler water, a partial fill, or a cold room. Cold retention follows the same logic: a keeps cold 24 hours claim assumes a chilled fill, a closed lid, and a measured ambient temperature, and brands that state only the hours give you no way to verify the comparison.
No single universal standard governs insulation claims, so numbers from different brands are rarely comparable. Honest suppliers state their test conditions alongside the result, such as after 12 hours at 20°C ambient, water dropped from 95°C to 62°C. A bare 12 hours hot claim tells you almost nothing. For your own spec, the practical approach is to define the fill temperature, volume, ambient temperature, lid position, and the required minimum temperature after a stated duration, then have the factory report against that exact protocol.
| Variable | Typical range | Effect on result |
|---|---|---|
| Fill temperature | 90–100°C | Higher start temperature shifts the curve |
| Fill volume | Partial to full | Less mass cools faster |
| Ambient temperature | Room to cold | Colder rooms draw heat faster |
| Lid position | Closed or open | Open lids lose heat much faster |
Practical takeaway: When comparing bottles, ask each supplier for the test conditions behind the claim, not just the headline hours.
Also: ISO 9001:2015, ISO quality certification
ISO 9001 certifies a factory's quality-management processes, not the safety of any individual product.
ISO 9001 is a quality-management-system certification. It confirms that a factory has documented, audited processes for design, purchasing, production, and corrective action, and that an external auditor has verified those processes are followed.
It is a certificate about the factory, not a test of the product. An ISO 9001 factory can still ship a bad batch; it just has systems to catch and correct the problem. In the same way, a product-level lab report says nothing about how consistently a factory runs.
The value for a buyer is reduced variation and repeatability. Documented control of incoming materials, in-process inspection, and nonconformance handling tends to produce more consistent output across thousands of units.
Practical takeaway: Treat ISO 9001 as evidence of process discipline, and pair it with product-level test reports and pre-shipment inspection for the specific order.
Also: leak test, drop test
Leak and drop tests check seal integrity with liquid under inversion or shaking, plus drop impact from defined heights onto hard surfaces.
Full entry →Also: Lebensmittel- und Futtermittelgesetzbuch, German LFGB
LFGB is the German food-contact law and the strictest commonly cited standard in Europe, testing migration plus odor and taste transfer.
LFGB stands for Lebensmittel- und Futtermittelgesetzbuch, the German food and feed code that includes food-contact rules. It is the strictest commonly cited standard in Europe, and many EU buyers and brands ask for it because passing LFGB signals a high bar on material safety. Products that pass are sometimes marketed with a frog mark in the trade.
EU member states base their food-contact rules on EU regulation 1935/2004, with national layers such as LFGB on top. The German layer is stricter than many others in one key way: it tests sensory properties, meaning whether the product transfers odor or taste to food, in addition to chemical migration. Because the sensory test uses human panels or trained assessors, results can vary slightly between laboratories, which is why the standard is set out in detail. For many European brands, an LFGB report is a prerequisite before a product can be listed, and some large retailers will not accept an FDA-only report as a substitute for their EU market.
A typical LFGB test report includes overall migration, specific-element limits, and sensory testing for odor and taste transfer. The sensory portion is what catches many products; a lid or silicone gasket can pass migration limits but still fail if it imparts a smell or taste. This is why LFGB is considered stricter than a migration-only check.
Here is how the two common regimes compare:
| Dimension | FDA (US) | LFGB (Germany/EU) |
|---|---|---|
| Basis | 21 CFR 170–199 | EU 1935/2004 plus German LFGB |
| Migration | Tested | Tested |
| Sensory (odor/taste) | Not the primary focus | Tested |
| Common proof | Lab test report | LFGB test report, frog mark in marketing |
Practical takeaway: If your EU market requires LFGB, specify it when ordering and ask for an LFGB test report for your exact SKU, including the sensory results.
Also: migration test, overall migration
Migration testing measures how much material transfers from a food-contact surface into food simulants under set time and temperature conditions.
Migration testing measures how much of a material moves from the food-contact surface into a food simulant under defined time and temperature conditions. It is the core of food-contact proof for both FDA and LFGB.
The report checks overall migration limits and, where relevant, specific-element limits such as lead and cadmium. The simulant and conditions are chosen to mimic the intended use, whether that is water, an acidic drink, or a fatty liquid.
| Element | What the report shows |
|---|---|
| Overall migration | Total material transferred into the simulant |
| Specific elements | Limits for lead, cadmium, and similar elements |
Because results depend on the material, the surface area, and the contact conditions, a report is valid only for the configuration tested. Changing a gasket, a coating, or a lid resin can invalidate the earlier result.
Practical takeaway: Ask for migration test reports that name your exact material combination and intended liquid type, not a generic factory report.
Also: ASTM B117, salt fog test
A salt-spray test exposes parts to salt fog for a set number of hours under ASTM B117 to accelerate corrosion.
A salt-spray test exposes parts to a salt fog under controlled conditions for a set number of hours, following a method such as ASTM B117. It accelerates corrosion to reveal how a coating or metal surface holds up in a humid, salt-laden environment.
Manufacturers use it as a proxy for coating adhesion and durability claims. A powder-coated or PVD-coated surface that resists the fog for more hours is expected to hold up better in real use, though the test does not reproduce every real condition. It matters most for exterior coatings on tumblers and bottles exposed to condensation, dishwashers, and coastal air.
The number of hours a part is exposed, typically around 24 to 72 hours, is chosen to match the durability claim. Ask the factory which surface, which standard, and how many hours were used, since the answer is specific to a coating.
Practical takeaway: Tie the salt-spray hours to a written coating-durability requirement in your spec so the factory tests against a target, not a default.
Also: Sedex, SMETA audit
Sedex is an ethical-supply-chain data platform, and SMETA is the audit format used within it to assess labor and safety practices.
Full entry →Also: independent labs, testing labs
Third-party labs are independent companies such as SGS, TÜV, Intertek, and BV that test against standards and issue reports.
Third-party labs are independent testing companies such as SGS, TÜV, Intertek, and Bureau Veritas. They test products against a named standard, method, or limit and issue a report that states the conditions and the result.
Their reports are the difference between a factory’s own claim and a lab-verified result. Because the lab has no stake in the sale, its report carries weight with importers, retailers, and customs authorities.
When you order tests, specify which standards you need, which lab should run them, and the exact SKU and color, because results are specific to the sample tested. A report for one lid color does not automatically cover another.
Practical takeaway: Name the standards and the lab in your purchase agreement so every report you receive covers exactly what your market requires.
The commercial vocabulary of OEM projects: MOQ, Incoterms, samples and more.
Also: harmonized system code, tariff code, customs code
HS codes classify goods for customs, and insulated vacuum vessels commonly fall under HS 9617.00, which sets the duty rate.
An HS code (Harmonized System) is the internationally standardized number customs authorities use to classify goods. The code, not the product name, is what determines your duty rate and whether any import restrictions apply.
Insulated vacuum drinkware commonly falls under HS 9617.00, which covers vacuum flasks and vessels with their cases. Confirm the exact subheading for your destination country, because duty rates vary by market even when the base code is the same.
Misclassification is treated as a compliance failure, not a paperwork detail: a wrong code can cause clearance delays, back-duty claims, and fines. This is one field where guessing is more expensive than asking.
Ask your forwarder or customs broker to confirm the code and duty rate for your exact product and destination before you finalize a quote, so the landed cost is real rather than optimistic.
Practical takeaway: Verify the HS code and duty rate for your specific destination before locking in a landed-cost estimate.
Also: International Commercial Terms, Incoterms 2020
Incoterms are ICC rules that define where cost and risk transfer between buyer and seller in international trade.
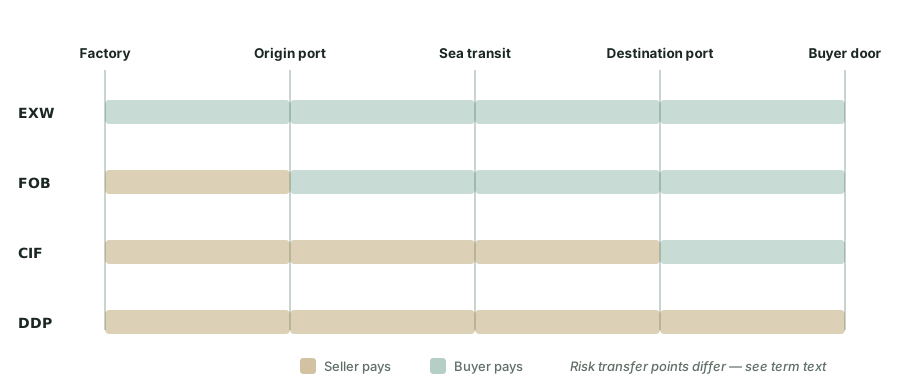
Incoterms (International Commercial Terms) are a set of ICC rules, most recently Incoterms 2020, that spell out who arranges and pays for each stage of transport and where risk passes from seller to buyer. They do not cover payment, ownership of goods, or the sales contract itself — only delivery responsibilities. The diagram above shows how each term shifts responsibility between the two parties.
EXW (Ex Works) is the most buyer-loaded: you take over at the factory gate and arrange and pay for everything after. FOB (Free On Board) means the seller delivers cleared goods onto the vessel at the origin port, after which risk and cost shift to you. CIF (Cost, Insurance and Freight) adds the seller paying freight and insurance to the destination port, but risk still transfers to you at loading. DDP (Delivered Duty Paid) is the most seller-loaded: the seller delivers to your door with import duties paid.
| Term | Who arranges main carriage | Where risk passes | Who pays import duty |
|---|---|---|---|
| EXW | Buyer | Factory gate | Buyer |
| FOB | Buyer | On board vessel | Buyer |
| CIF | Seller | On board vessel | Buyer |
| DDP | Seller | Buyer’s door | Seller |
New importers often prefer DDP for a predictable landed cost, while experienced buyers with their own forwarder frequently take FOB and control the freight leg themselves. Whatever you choose, the term should be written into the proforma invoice and matched with the insurance you actually need. Ask your freight forwarder to quote the full landed cost under each term before you choose.
Practical takeaway: Pick the term that matches how much of the shipping and customs process you want to control, and confirm it in writing on every proforma invoice.
Also: production lead time, delivery time
Lead time is the total time from order confirmation to delivery, spanning sampling, production, and shipping.
Lead time is the total time from confirming an order to receiving the goods, and it is best understood in three parts: sampling, production, and shipping.
Sampling commonly takes one to two weeks, or longer if custom tooling is involved. Production commonly runs 25–40 days depending on order size, finishing processes, and how many colors the line must change between. Shipping then adds transit time that depends entirely on the mode you choose.
Two factors reliably stretch lead time: Chinese New Year, when the entire supply chain pauses for weeks, and custom color batches, which must be mixed and approved before production can start.
When you compare a factory’s promised 30 days against another’s 45, check whether both numbers include sampling, tooling, and transit, because only one of them may be counting the same things.
Practical takeaway: Add sampling, tooling, and transit to the quoted production days to get your true door-to-door lead time.
Also: minimum order quantity
MOQ is the minimum order quantity a factory will accept, usually quoted per SKU and per color.
MOQ (minimum order quantity) is the smallest order a factory will accept for a given product. It is usually quoted per SKU and per color, not as a single number for the whole container.
MOQs exist for practical reasons. Each color is mixed and sprayed in batches, each changeover between models or colors costs machine time, and custom packaging has its own printing minimums. These fixed costs are what make small runs uneconomical.
The quoted MOQ is rarely absolute. A buyer who takes stock colors and standard lids will usually get a lower MOQ than one who specifies a custom powder color and a custom mold. Trade scope is the real lever: the more you standardize, the more the number can move.
When you compare factories, ask for the MOQ per SKU, per color, and per lid type rather than accepting one headline figure, then confirm what happens when you split an order across colors.
Practical takeaway: Treat MOQ as a starting point for negotiation, and reduce it by sticking to stock colors and standard lids.
Also: non-disclosure agreement, tooling ownership
An NDA protects your designs, while a mold ownership clause states who legally owns tooling you paid for.
An NDA (non-disclosure agreement) protects the drawings, specifications, and commercial correspondence you share with a factory. It is a standard request, and any serious supplier will sign one before you release proprietary design work.
Mold ownership is a separate and equally important question. When you pay for custom tooling, you should own it — which means the factory cannot reuse your mold to make your product for a competitor. This is what actually protects your investment.
Ownership is only as strong as the written clause. A verbal promise that the mold is yours is not enforceable, so the ownership term belongs in the contract alongside the tooling fee.
Also agree on the practical details: where the mold is stored, who maintains it, and what happens to it if either party ends the relationship — whether it ships to you or is scrapped.
Practical takeaway: Sign an NDA before sharing designs and get the mold ownership clause in writing before paying the tooling fee.
Also: Original Equipment Manufacturing, Original Design Manufacturing, Original Brand Manufacturing
OEM, ODM, and OBM describe who owns the design, the tooling, and the brand in a manufacturing relationship.
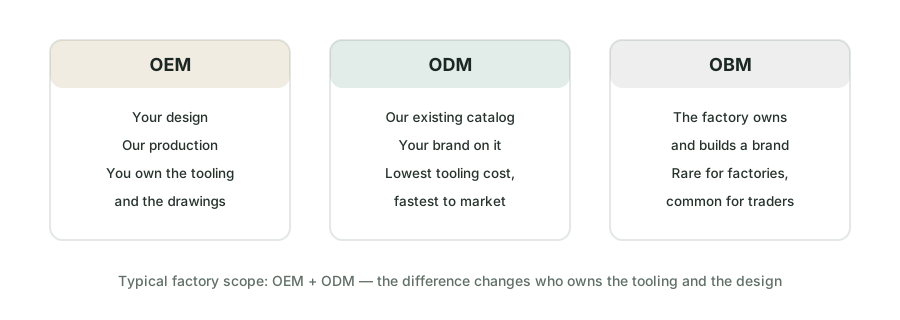
These three terms describe a spectrum of who owns the product, from the buyer supplying everything to the factory owning everything. Most stainless-steel drinkware factories operate in the first two categories, and many buyers start at one point and move along the spectrum as their brand grows. The distinction matters because it changes who owns the tooling, who owns the design files, and how fast you can launch.
In OEM (original equipment manufacturing), you supply the drawings, specifications, and brand artwork. The factory produces to your requirements. You own the design and, where you have paid for them, the custom tooling. This is the right route when you need a product that does not exist in a catalog, but it carries longer sampling and higher tooling costs.
In ODM (original design manufacturing), the factory already has a developed product and you adapt it with your logo, color, and packaging. This is the fastest and lowest-tooling route to market, because the engineering, tooling, and testing have already been done. Your differentiation is the brand, not the physical design.
| Model | Who owns the design | Who owns tooling | Speed to market |
|---|---|---|---|
| OEM | Buyer | Buyer (if paid) | Slower, custom |
| ODM | Factory | Factory | Fastest |
| OBM | Factory | Factory | Full brand build |
The practical difference for a buyer is who controls the tooling and the design files. Confirm this in writing before you commit, because it determines whether you can take your product to another factory later. Buyers who start with ODM can often move a successful item into OEM once volume justifies the tooling.
Practical takeaway: Choose ODM for speed and low upfront cost, and OEM when the product itself must be unique.
Also: branding, custom branding, logo printing
Private label means putting your brand on a factory's existing catalog product, the fastest and cheapest route to market.
Full entry →Also: pre-production sample, approval sample, PPS
A pre-production sample is made on the real production line, and the approved golden sample is the reference both sides keep.
A pre-production sample (PPS) is made on the actual production line with real materials and tooling, before mass production begins. It exists so you approve what the factory will actually build, rather than a hand-made prototype that never survives to the line.
The golden sample is the approved reference that both you and the factory keep. It is the standard every later unit is compared against — by the production team during the run and by any third-party inspector before shipment.
Sample fees and courier fees are usually charged, and most factories will deduct them from the bulk order once you place it. This is not a penalty; it covers the real cost of setting up a line for a small batch.
Never skip the PPS on custom work. An unapproved color, logo position, or lid fit is far cheaper to fix on a sample than on a full container.
Practical takeaway: Always approve a pre-production sample and keep the golden sample yourself, so there is an agreed reference for inspection.
Also: stock-keeping unit, item number
A SKU is a stock-keeping unit, one unique product configuration; colors, sizes, and lids multiply them quickly.
Full entry →Also: telegraphic transfer, letter of credit, bank wire
T/T is a bank wire transfer and L/C is a bank-guaranteed letter of credit, the two main payment methods in B2B trade.
Two payment methods dominate drinkware sourcing: T/T (telegraphic transfer, a direct bank wire) and L/C (letter of credit). T/T is the default for most orders; L/C appears on larger or more formal transactions.
A typical T/T structure is a deposit of commonly around 30% before production and the balance before shipment. The deposit exists for a concrete reason: the factory buys raw material and, on custom work, cuts tooling before any product exists. That money is committed before a single bottle is made.
An L/C is a bank’s promise to pay once you present documents that meet the terms, which adds cost and paperwork but protects both sides on high-value orders. Many factories will accept an L/C only above a certain order value, so ask early.
The balance-before-shipment step can feel risky to a first-time buyer, but it is standard practice because the factory cannot recover goods already at sea if payment fails.
Practical takeaway: Budget for a deposit of roughly 30% before production and plan the balance for before the goods leave the factory.
Also: pre-shipment inspection, PSI, quality inspection
A third-party inspection checks finished goods against the approved sample and an AQL level before shipment.
Full entry →Also: mold fee, tooling charge, die fee
A tooling fee is the one-time cost of custom molds or embossing dies, often amortized or waived above a set volume.
A tooling fee is the one-time cost of making the physical molds, dies, or tooling needed for a custom shape, lid, or embossed logo. Standard catalog parts need no new tooling, which is why private label is cheaper and faster.
Tooling is a genuine engineering cost, not a hidden markup: a custom lid mold or an embossing die must be machined, hardened, and tested before a single production unit is made. Tooling lead time also adds directly to your sampling time.
How the fee is treated depends on volume. Many factories will amortize the tooling into the unit price or waive it entirely once you exceed a stated quantity, so the number you see on a first quote is often negotiable against your order size.
The single most important question is not the price but the ownership — who owns the mold, and whether the factory can use it for other customers. That is covered separately in NDA & Mold Ownership.
Practical takeaway: Ask whether tooling is amortized or waived at your volume, and get the ownership clause in writing before you pay.
Also: volumetric weight, dimensional weight, shipping modes
Air and express charge by volumetric weight, so bulky light cargo like empty bottles is costly; sea freight suits bulk.
Shipping cost depends on more than actual weight. Air and express carriers charge by volumetric weight, calculated from package dimensions — commonly length × width × height in centimeters divided by 5000 or 6000, depending on the carrier.
This matters for drinkware in a specific way: empty stainless-steel bottles are bulky and light, so their volumetric weight is far higher than their real weight. That makes air and express freight expensive for anything beyond samples or urgent top-ups.
Sea freight is the default for bulk orders because it charges by container volume rather than per-kilogram dimensional weight. The trade-off is time — ocean transit is measured in weeks, not days.
Express couriers remain the right tool for samples, approval pieces, and small urgent restocks, where speed is worth more than the dimensional-weight premium.
Practical takeaway: Ship samples and urgent top-ups by express, but route bulk empty-bottle orders by sea to avoid volumetric-weight costs.
Tell us what you were trying to look up - we answer every message personally, and this glossary grows from real questions.
Ask on WhatsAppmarket@watersycup.com